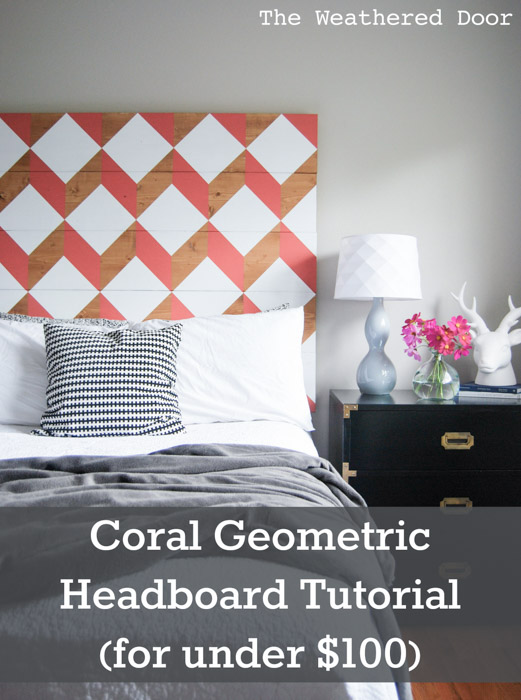
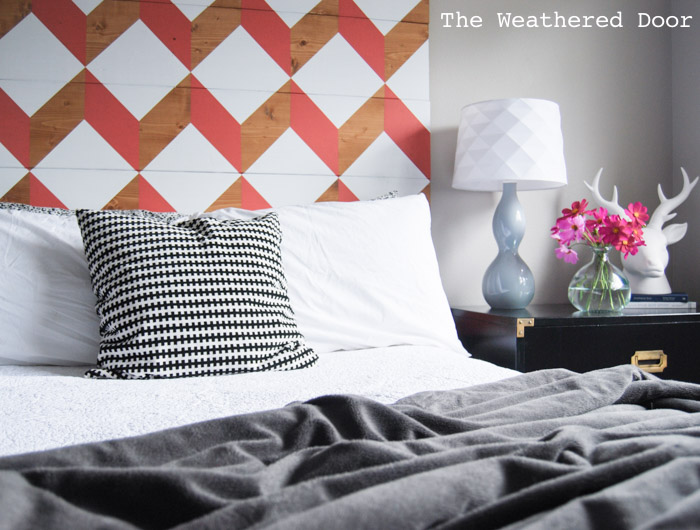
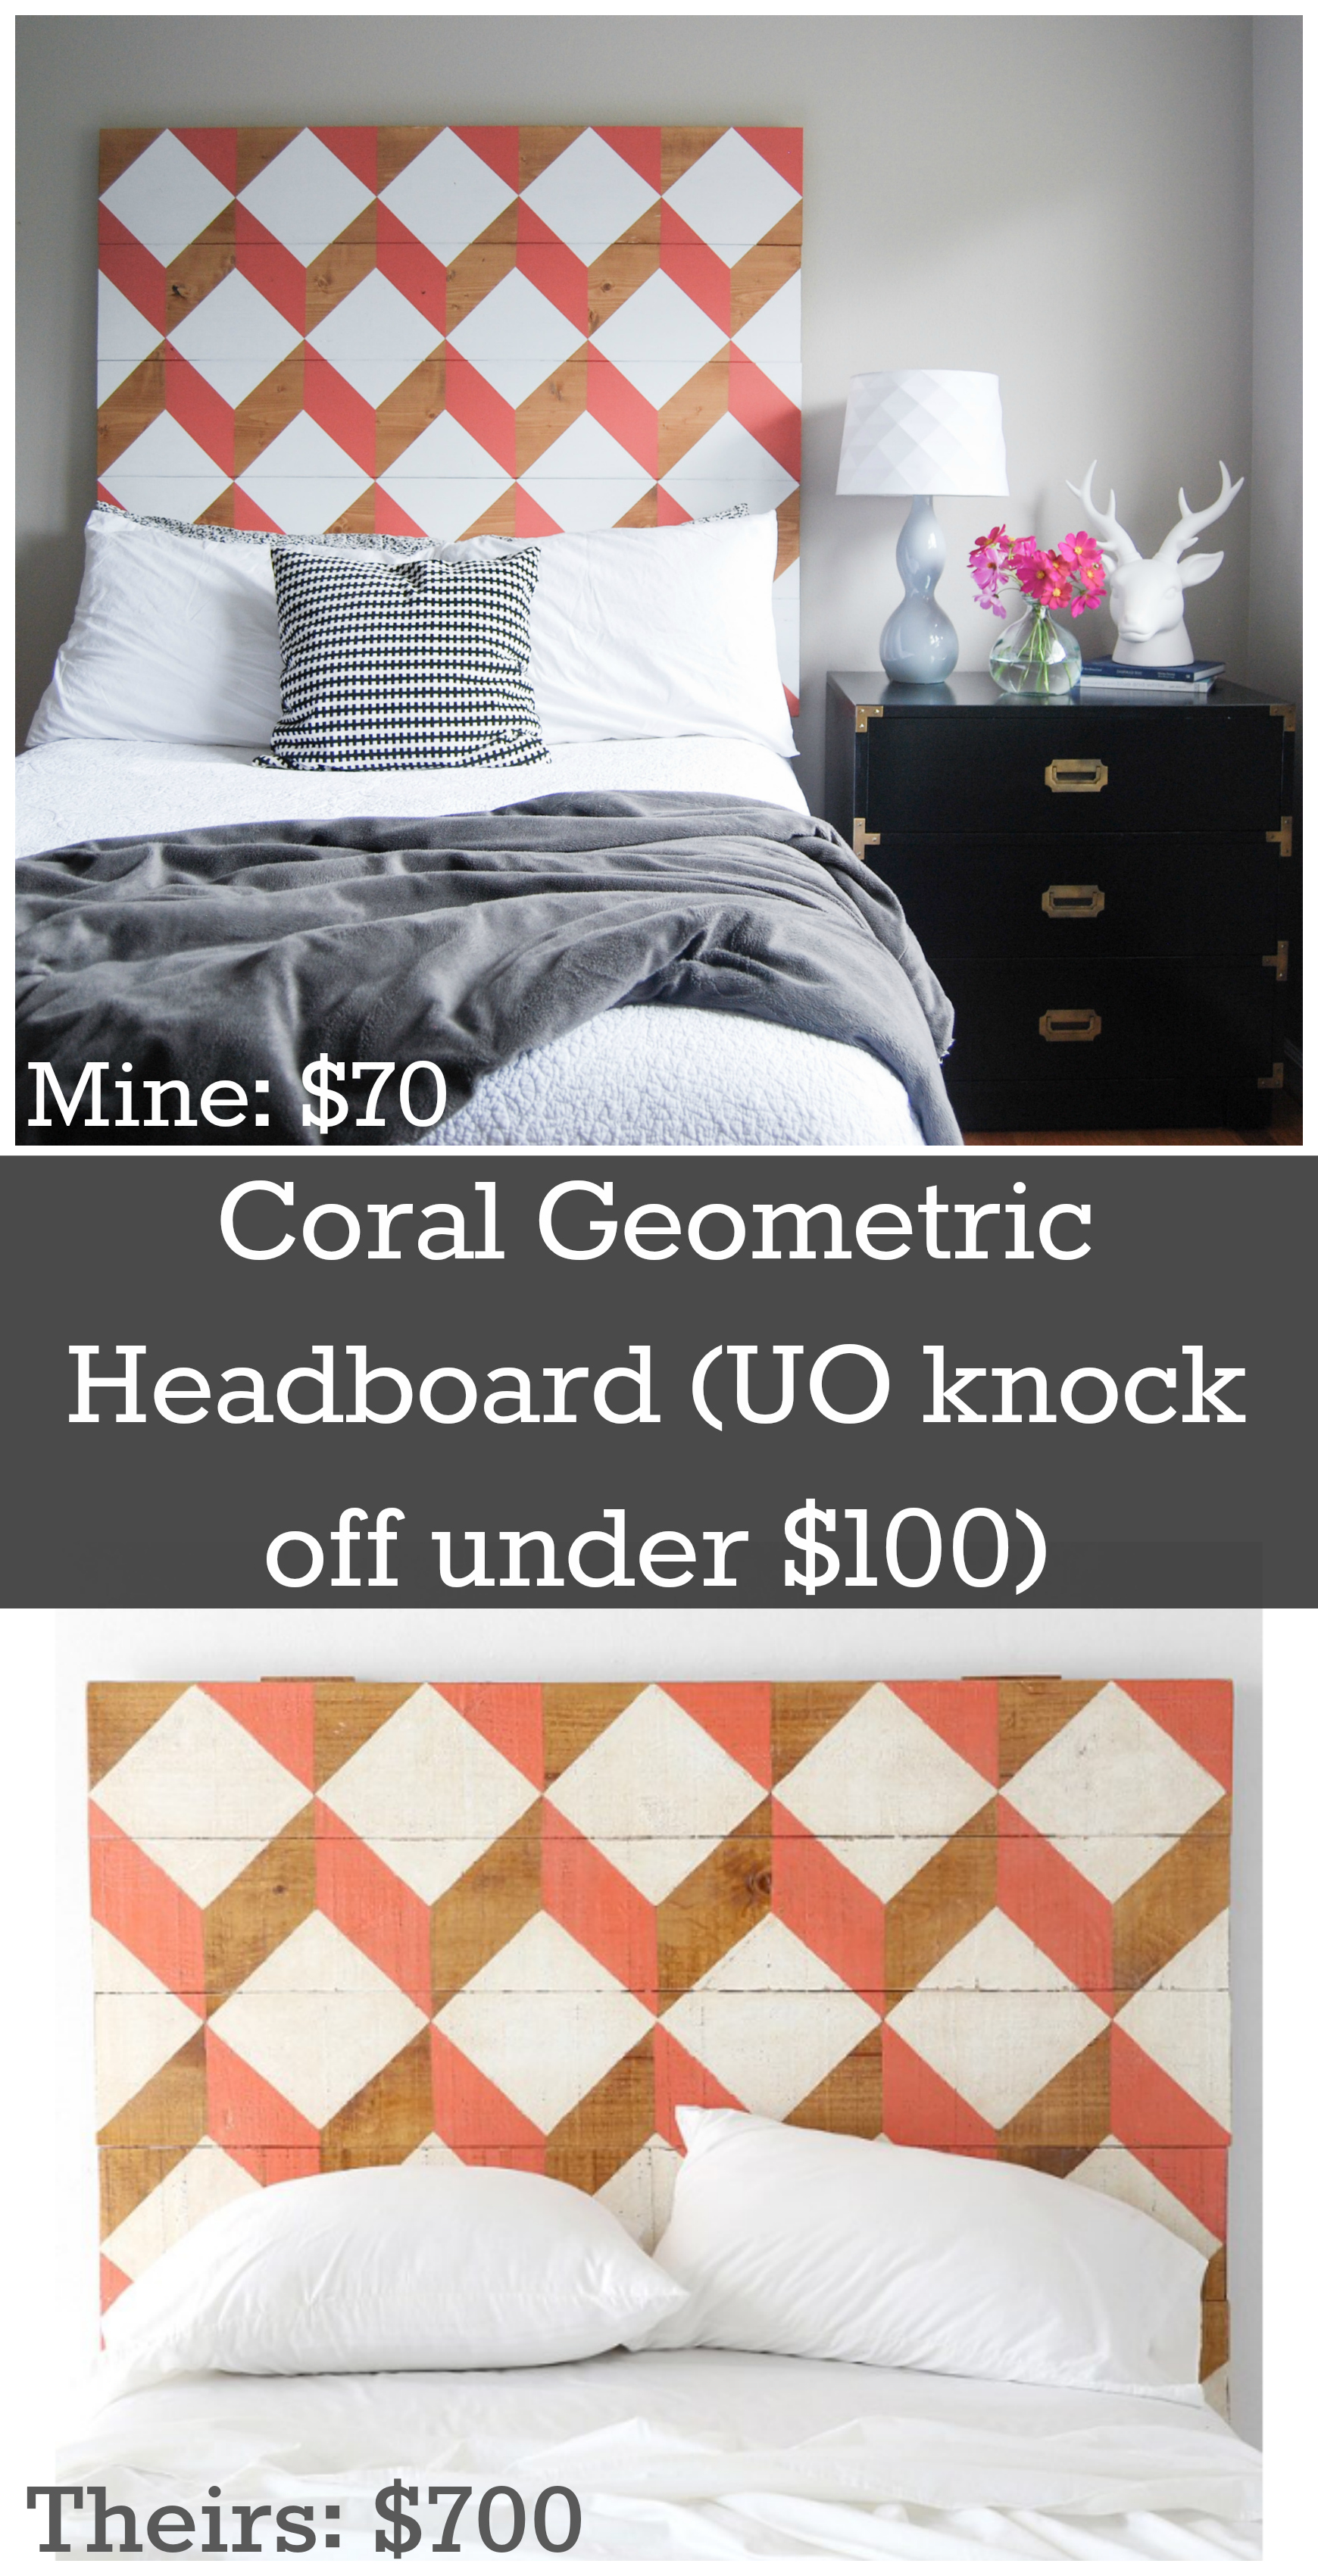
I’m giving you all the details today on the geometric wood headboard I made. First, go here if you have not already seen photos and to find out where the idea came from.
After deciding I was building my own knock-off Urban Outfitters geo headboard I had to begin deciding how large I wanted it to be. I looked at the measurements of the full/queen headboard UO sold and I measured my bed (it’s a full size) too see how high off of the ground it was and the width of it. My bed is 27″ high and about 54″ wide, and I wanted the headboard to extend just past the width of the bed, so I made it 56″w, raised it 27″ off the ground, and the height of the actual geometric part is just under 47″. Here’s a photo that might help you visualize all of those measurements.

Let’s start off with supplies and what I used to build the headboard.
Supplies
- 3, 1″x10″x10′ whitewood boards from Lowes (had them cut to 56″ so I ended up with 6 boards and only used 5 for the planked part of my headboard)
- 1, 1″x6″x12′ whitewood board (had this cut in half to hold the planks together and act as legs to hold the headboard up)
- 1 1/4″ screws
- measuring tape
- drill

Staining
First, before putting the headboard together I stained the boards. For stain I made a custom mix using General Finishes (GF) Gel Stain in ‘Antique Walnut’ mixed with Minwax ‘Ipswich pine’. [Note: the GF can said not to mix or dilute the stain, but I did. I tested it on a scrap piece of the wood and it was fine] Before staining I applied a good coat of Minwax pre-stain conditioner. I just wiped it on with an old sock, let it sit for maybe 3 minutes, and then applied my stain mixture. I did end up applying a second coat of the stain 24 hours later (once the headboard was assembled) because it wasn’t as dark as I wanted it to be. After the second coat of stain cured, I applied 2 coats of GF HP topcoat in flat to seal everything.

Assembling the Headboard
After the boards were stained and dry, my dad and I began laying out the headboard. We laid a work blanket/sheet down to protect the boards and just eyeballed everything to start with. I had to make sure all of the ends of the boards lined up. Even though they were all supposed to be 56″ long, they varied so I switched the order until I liked they way it looked. Next, we lined up the legs. We put the legs so they started about an inch and a half below the top board and were the same distance from each side. We then used a measuring tape to make sure the measurements lined up and everything was symmetrical.
*Note: if you build a headboard and plan to attach it to a bed frame, make sure the legs are the correct distance apart so they match up with the bed frame. I chose not to attach the headboard to my bed frame, so I didn’t need to worry about this.
Next, my dad made pilot holes only in the 1″x 6″ boards with a drill bit smaller than the size of screws we using. Screw placement didn’t need to be exact, so we did not measure. Total, we used 20 screws. Each of the 5 planked boards are held on with 4 screws, 2 in each of the legs.


Taping and Measuring
Here’s the part where things got exciting! But first, calculations. Boo!
Just like the UO headboard, I wanted 5 full white diamonds to go across the top. To figure out what size they needed to be, I took the 56″ width of the headboard and divided it by 5. You get 11.2 if you are wondering 🙂 This meant that the height and width of each diamond would be 11.2″. Next I had to figure out how thick I wanted the herringbone/chevron looking pattern between the diamonds to be. In order to make it easy for me, I made it half the size of the diamonds, which is 5.6″. This made it simple because that is also the amount of space the next row of white diamonds is offset from the top row. The only 2 measurements I really worked with were 5.6″ and 11.2″. For measuring I used a measuring tape and a ruler. I made a mark with a sharpie on the ruler at 5.6″ and 11.2″ so it was obvious for me to see.
I spent 4 and 1/2 hours taping one night… until 1:30am. My back was killing me from kneeling and bending over (I had the headboard laying on the floor inside and I just sat on top of it and taped), so I called it a night and finished in the morning. The total amount of time I spent taping just the white part of the design was 6 hours. Of course there was a mistake in there that meant redoing part of a row. I also tend to be a perfectionist, so I took my sweet time. It’s not a hard project to do, just time consuming!
I have a taping and measuring technique that works for me when I am painting designs (like the geometric designs here, here and here). The horizontal lines of tape you see I put down to mark the 11.2″ of the design I was working with. It also made it easy for me to make marks with a sharpie directly onto the tape. People in my family do not understand what I did to tape it and thought I was doing it wrong the whole time, so if the photo confuses you, ignore it. haha! I’m the one who did it and it looks confusing! I just made sure to measure out each diamond but to also measure the distance from each line and point to others around it so I knew my tape was in the right place.
*The picture below just shows the white diamond taped out, after taking the picture I taped off all parts of the wood that were not being painted white since I always get paint splatter when I’m painting. I definitely recommend covering the other parts!*


Taping this part was much easier because I did not really have to measure many parts. I just tape over where the edges of the white diamonds and connected the points. The only places I did need to measure were on the vert top and bottom rows where the design goes off of the wood.


- Three 1″x10″x10′ for the planked front ($18.04 each from Lowes): $54.12 (I only used 5 of the 6 boards)
- One 1″x6″x12′ for the legs (from Lowes): $12.38
- Pack of 1-1/4in wood screw (from Home Depot): $1.99
- Stain (GF gel stain in ‘Antique Walnut’ and Minwax in ‘Ipswich Pine’): $0 (already owned)
- General Finishes HP topcoat in flat: $0 (already owned)
- General Finishes ‘Snow White’ milk paint: $0 (already owned)
- General Finishes ‘Coral Crush’, ‘Persimmon’, and ‘Seagull Grey’ milk paint: $0 (already owned)
- ScotchBlue Delicate Surface Painters Tape: $0 (already owned)
- Total Spent: $68.49

Awesome job!!
Stephanie
You did an amazing job! You have MAD paint skills girl! Love it! Shared it on my Facebook page!
This is stunning! I love the pattern and it really works with the colors of your room!
Wow this is awesome and only a fraction of the cost too! Would love if you came and linked up at Merry Monday. Pinned.
Wow… Where is the lamp from?
I am totally obsessed with your headboard!!! Featuring you tomorrow. XO, Aimee
I'm visiting from Unskinny Boppy. This looks awesome! It looks very expensive!
-Katy @ mcentirehousemakeover.com
Absolutely AWEsome! Thanks for sharing at the #BestofDIY party! So pinning, pinning,pinning your beautiful knock off.
Therese @FreshIdeaStudio
Thanks so much!
It's an Ikea lamp base (I got it at goodwill) and the shade is from Target.
i have a question. i am currently finishing a bed with pallets and i will stard a headboard soon. but my plan was to attach two woods horizontally to the wall and then screw other woods vertically onto those woods on the wall. how did you make sure your headboard is not moving and it is stable? pls enlighten me im new at this.
I made mine with “legs” that go all the way to the floor and that are spaced to attach to a bed frame. I never did attach them, I just leaned the headboard against the wall behind my bed and have felt pads on the back. It doesn’t move, but you could also mount it to the wall.