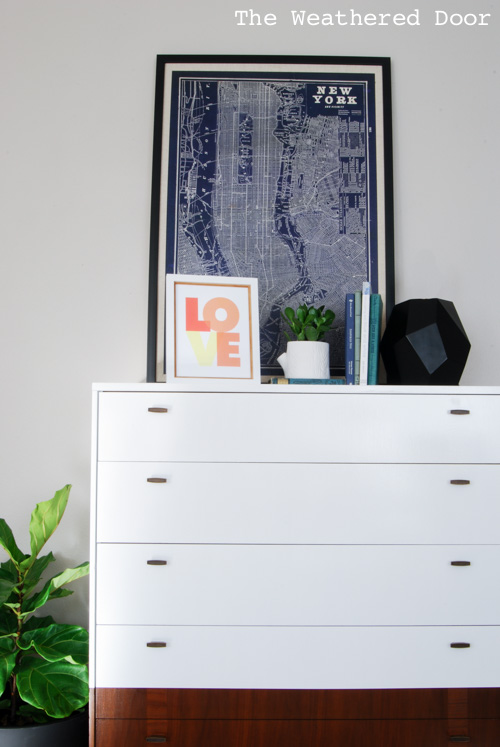
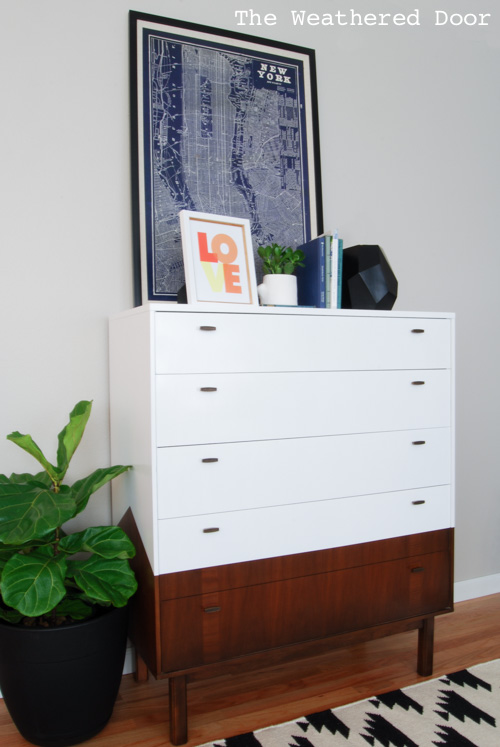
I’m pretty excited about how this piece turned out. It’s actually the matching high boy to the Mid Century Credenza with the white top I did a few weeks back. I originally only purchased the long credenza from the craigslist seller because the price for this taller dresser was more than double the other piece, but after weeks of it not selling, I got it for the price I had offered him.

This dresser was in worse condition, but that ended up being alright since I had a plan to do a reversed dipped look with it. The finish on the top was really worn and some chunks of veneer were missing and had to be filled in with wood filler. Here’s my plan I had drawn out.

To start, I wet sanded the 2 lower drawers and the bottom half of the dresser with 320 grit sandpaper. Once it was dry I went over it really lightly with 400 grit sandpaper over a sanding pad, then wiped it clean. You can read how I stain over a previous finish here, I’ve got pictures and steps to help you visualize it. This time I used General Finishes Antique Walnut Gel Stain. Because a large portion of the dresser was going to be white, I didn’t want a duper dark stain, just a nice walnut color to refresh the wood. I let it dry for about 36 hours before sealing the parts I stained with GF’s high performance topcoat in satin.
Now that the staining and seal was done, I began measuring and taping out the portion of the dresser that would be painted. I purposely made the line where paint would start be off centered on the drawer to give it an asymmetrical look. Once everything was taped and measured I use poly to make sure no paint would bleed under the tape. You can read how to get perfectly clean lines here. I used my grey tinted Zinsser Cover Stain primer which I applied with a foam brush and let dry overnight. I then sanded and began painting. Before using white paint I added a coat of GF’s Seagull Grey so it was easier for the white paint to cover. For paint I used General Finishes Snow White milk paint (it’s actually an acrylic paint, not a milk paint). I used 6 thin coats to get the coverage I wanted. White paint always take so many coats! I did water it down slightly to get a smoother finish and help the paint level a bit so that also caused me to need more coats of paint. Once the paint dried, I sealed it with General Finishes high performance topcoat in Gloss for a lacquered finish look. I then removed the tape, added the original hardware back on, and it was done!


This turned out beautifully!
Nice! It looks great, and it's not something you see very day–good work 🙂
GORGEOUS!! You always amaze me.
Oooh! I'm jumping up and down for joy for this one! Seriously, come to the new link party at http://www.houseofhipsters.com This Saturday at 8PM (Central Time)!
love this! i finally, finally revealed my own mcm piece that's been sitting in my garage for 4 years. i don't have your skills, so i waited for my boyfriend to work on it. glad to have my own piece so i can stop envying yours, lol.
b
This piece is absolutely gorgeous. So nice to see something fresh and not the same old same old painted piece. Nice work. Thanks for sharing!!!!!
Great piece…love it. Visiting from Found & Foraged. -Kristi
Wow, this dresser turned out great! I never thought to reverse dip a piece of furniture m great idea!
I am pinning this right now. I am totally in love. So glad you linked this one up to our linky party!
I am IN LOVE. Wow, seriously this is amazing. Thank you so much for adding this beauty to our Found & Foraged link party. Please come again!!!
This is a stunning MCM makeover – just love what you did with it!
Ditto on Stunning! Fab job. Did you end up selling this one already?? Thanks for the poly tip.
You stole our heart with this one! Thank you so much for linking up at Found & Foraged! PINNED! Hope to see you again this Saturday night at 8PM at http://houseofhipsters.com
Love this piece you did such a great job, would you be able to reveal where you got the amazing rug?
I love this so, so much. I'm going to try and recreate it in our next house.
I'm half smiling half blushing to read through these comments and see Grace, Kyla and me all geeking out about this gorgeous project. I'm guessing after all that you weren't surprised to see it was featured at Found & Foraged huh?! We all three independently picked you as a favorite. Just wanted to stop by and say thanks again for linking up. xoxo!!
it looks beatutiful! what type of brush did you use to apply the snow white, I am working on a table top and can see my brush strokes. Thanks for your advice!
When applying paint with a brush instead of my sprayer I use a 2″ synthetic bristle angles trim brush. I like the ones with the short handles.