I shared the makeover of a Mid Century Modern Credenza last week where I used General Finishes Gel Stain over the existing finish on the piece and wanted to share how I did that.
I think one misconception is that you have to strip and sand a piece down to bare wood before you can re-stain it. Sometimes that is necessary, but if you have a piece without much of a topcoat (sealer, poly, etc) and the finish is in good shape, you can go over it with a gel stain. Here’s what I did to darken the color and freshen up the finish on a mid century dresser. (steps and details below the picture).
If you have a piece that needs to be stripped because of a laquered topcoat or worn and chipped finish I have a video tutorial of how to strip furniture here. Stripping stained pieces really isn’t too bad.
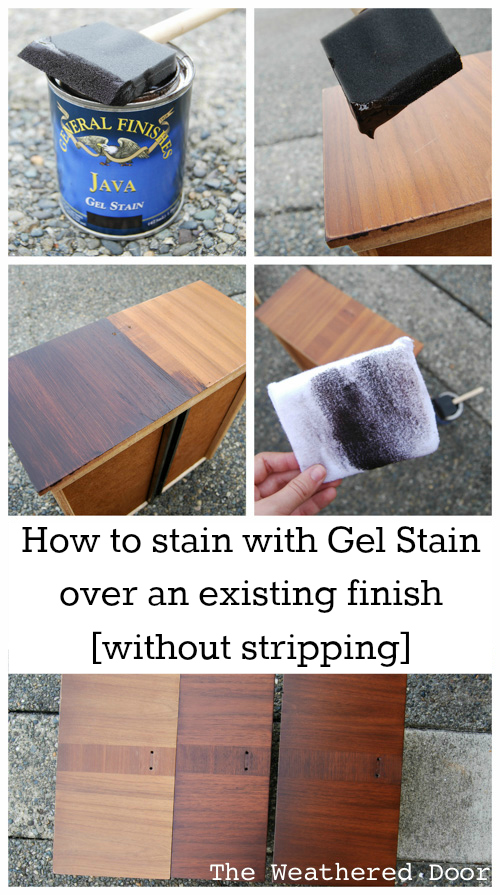
CLICK HERE for a video tutorial on How to apply Gel Stain.
Good to know – thanks for the tip! I have a piece waiting in the workshop that I want to restain but didn't want to have to strip it. This just saved me loads of time 🙂
Marie@The Interior Frugalista
Your process does not seem like it saves that much time over stripping with a liquid stripper. Wet sanding … really…. uggggggg. This product is not supposed to require that much prep. Wanting to do my stairway handrail and posts … this process would take FOREVER. Rethinking gel stain i guess.
Thanks so much for this tip! I'm pinning!
Leslie
House on the Way
Great tips! I've really been wanting to use a gel stain, I've heard good things! I also just got a cute little dresser I want to re-stain, and this will come in handy! 🙂 Pinning!
Good tips. GF recommends 72 hours before using a water based top coat over an oil based product. The 6-8 hours is for re coat. Nice piece.
Looks great, that is the color I was hoping to achieve on my cabinets. It looks like you only did one coat of G.F. Java gel stain? Most places online I've seen people do 3 or 4 coats of java and it turns out much darker than I would like. Thanks for the information!
I went looking for this post to re-read and see if you used mineral spirits between coats. It appears you did not. Curious if you have in the past and what the results were? I
Beautiful work! This wonderful product is so versatile! In case you haven't tried it, you can also use it just like paint. You apply with a wiping pad, but DO NOT wipe off. The gel finish dries in a couple of hours, but you should wait several (I always wait a day) to put the next coat, applying subsequent coats til you get the color you want. I frequently get furniture with a deep scratch or two – this method allows you to provide layers of fresh finish on top the scratches, and give tops a deep finish. Under 2 or 3 coats of gel finish, the scratches look like wood grain. My favorite is Java color, because it gives the richest color for this technique. Debbie at The Magpie's Cottage.
How do I EVENLY stain a 1930s curved table made from different types of wood? I want to achieve a rich, dark high gloss finish on this deco piece. Last time i tried something like this, the various types of wood accepted the stain differently and looked very blotchy and uneven. Should I use wood conditioner first? Suggestions.
Use a pre stain conditioner. Then add more coats on just the lighter areas.
You probably won't get an even finish since there are different types of wood which already have their natural color and wood grain. Stain does change that, but you can only do so much so I don't think an perfectly even coat will work. If you mean even like "not blotchy" then strip the piece, sand, and first use a pre-stain wood conditioner before staining.
How do I get water damage off the cabinet door before I stain
I don’t have experience with that, I would search for a woodworking forum where professionals talk about wood refinishing. There would probably be lots of great info and tips there.
I’m proud of you. Good work.
Will this work on low luster poly top coat or will I need to completely sand?
I have used it over topcoats after wet sanding. It had worked on most pieces. I’d say it’s worth a try because even if it doesn’t work you can still strip, sand, and then stain.
If you didn’t sand enough, or only use a liquid sanding/cleaning product, what will happen or how will you know if you didn’t do enough?
There are many one of a kind home improvement possibilities accessible to anyone seeking to make a change in their home environment. your blog helps us to have knowledge especially in woodworking forum where professionals talk about wood refinishing. thank you for sharing this with us.
I love using the General Finishes Java Gel Stain! I have used it to refresh faded cabinets and the result is such a warm, fresh color! I apply the stain with a foam brush and typically wipe it off immediately. Two coats is usually sufficient and depending on the coats, I may put a top coat on or not. One coat would require a top coat, but two or three do not require it as the product contains polyurethane.
Wiping the stain off right away keeps the wood grain and enriches it so that it nearly looks new. I haven’t tried using the product like paint yet except for the inside of a cabinet to just refresh and give a clean appearance. It took forever to dry until I lightly sanded it with 000 steel wool.
What a great way to refresh cabinets and woodwork! So much better than Rejuvenate!
I really found your instructions very easy to follow. I was wondering will minwax be an option as a top coat?
What would you recommend for kitchen cabinets? My concern is that rhe cabinet fronts are different than the framework, sides and moulding. I’m afraid it will take the stain differently. Any suggestions?
Thank you,
Teresa W.
Would the stain gel work on kitchen wood seat chairs or would it come off unless I sand??
Hello – I’m refinishing my bathroom cabinets with Java Gel Stain. I thought it would be easier to use an electric sander instead of sanding by hand! Now I have areas where the sander went all the way down to the wood grain and some areas with the old stain. Although the finish is smooth but im worried the gel stain will not apply evenly now. Do I need to sand th entire surface to the wood grain now!
Call me crazy for even thinking of trying to do this but before I do, what would happen if I tried applying a much lighter gel stain to a medium dark old desk? After wet sanding, would a very light white/grey or something like it affect a visible change. I hate the way the desk is now and don’t want the heavy look of paint on something like this. Thanks for your thoughts.